Warp + zsh + starship

Table of Contents
Terminal setup using warp, zsh and starship #
I’m going to show you how to setup your Starship prompt to look similar to powerlevel10k theme. Our goal is to get something like this:

Step-by-step setup #
Fisrt we need to install Warp and you can install it by running:
brew install --cask warp
Next we need to get Nerd Fonts so we can display all cool icons in terminal. Which one you want it’s up to you, my choice is Hack Nerd Font and you can download them here. Once you downloaded them extract them from zip and install fonts. You can double click them to install or open Font Book (CMD + Space and search font book) and drag and drop them into Font Book.
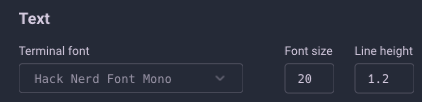
Let’s set them as our font choice in Warp. Open Warp go to Settings -> Appearance -> Text -> Terminal font, and set your font to Hack Nerd Font Mono.
Let’s set up Starship now. First thing you’re gonna do is download Starship by running this command:
curl -sS https://starship.rs/install.sh | sh
After it’s done let’s open our ~/.zshrc (you can use vi, VS Code, or any other text editor).
vi ~/.zshrc
And add the following to the end:
eval "$(starship init zsh)"
In Warp terminal we will need to se it to honor users custom prompt. Go to Settings -> Appearance -> Prompt -> Shell prompt (PS1).
 This will override Warp’s default out-of-box prompt with your Starship prompt.
Starship configuration #
To get started configuring starship, create the following file: ~/.config/starship.toml:
mkdir -p ~/.config && touch ~/.config/starship.toml
Then let’s open it with text editor:
vi ~/.config/starship.toml
Now just click copy and paste following configuration into your starship.toml file and save it.
format = """\
[](bg:#030B16 fg:#7DF9AA)\
[ ](bg:#7DF9AA fg:#090c0c)\
[](fg:#7DF9AA bg:#1C3A5E)\
$time\
[](fg:#1C3A5E bg:#3B76F0)\
$directory\
[](fg:#3B76F0 bg:#FCF392)\
$git_branch\
$git_status\
$git_metrics\
[](fg:#FCF392 bg:#030B16)\
$character\
"""
[directory]
format = "[ $path ]($style)"
style = "fg:#E4E4E4 bg:#3B76F0"
[git_branch]
format = '[ $symbol$branch(:$remote_branch) ]($style)'
symbol = " "
style = "fg:#1C3A5E bg:#FCF392"
[git_status]
format = '[$all_status]($style)'
style = "fg:#1C3A5E bg:#FCF392"
[git_metrics]
format = "([+$added]($added_style))[]($added_style)"
added_style = "fg:#1C3A5E bg:#FCF392"
deleted_style = "fg:bright-red bg:235"
disabled = false
[hg_branch]
format = "[ $symbol$branch ]($style)"
symbol = " "
[cmd_duration]
format = "[ $duration ]($style)"
style = "fg:bright-white bg:18"
[character]
success_symbol = '[ ](bold green) '
error_symbol = '[ ✗](#E84D44) '
[time]
disabled = false
time_format = "%R" # Hour:Minute Format
style = "bg:#1d2230"
format = '[[ $time ](bg:#1C3A5E fg:#8DFBD2)]($style)'
Now you should see your prompt look nice similar to powerlevel10k theme.
Theme configuration #
Last thing to get it looking good is to set theme that goes nice with it.
To do it run:
mkdir -p ~/.warp/themes/ && touch ~/.warp/themes/p10ktheme.yaml
Then:
cd ~/.warp/themes/
And run:
vi p10ktheme.yaml
Now just click copy and paste following configuration into your p10ktheme.yaml file and save it.
accent: "#38ff9c"
background: "#010b17"
foreground: "#ebddf4"
details: "darker"
terminal_colors:
  normal:
    black: "#0b3b61"
    red: "#ff3a3a"
    green: "#52ffcf"
    yellow: "#fff383"
    blue: "#1376f8"
    magenta: "#c792ea"
    cyan: "#ff5dd4"
    white: "#15fca2"
  bright:
    black: "#62686c"
    red: "#ff54b0"
    green: "#73ffd8"
    yellow: "#fcf4ad"
    blue: "#378dfe"
    magenta: "#ae81ff"
    cyan: "#ff69d7"
    white: "#5ffbbe"
Now we need to set it in Warp to use it. In Warp, go to Settings -> Appearance -> Themes, and type in “p10ktheme”. Click the theme that appears. And you should now have awesome powershell10k dupe in your terminal!
Extra tools #
Those are some of the nice to have extra tools for your terminal to make it nicer and more usefull.
exa #
Exa is a modern replacement for ls. It gives it more features and better defaults. It uses colours to distinguish file types and metadata. It knows about symlinks, extended attributes, and Git. And it’s small, fast, and just one single binary. Here is the link to GiHub repository:
A modern replacement for ‘ls’.
To install exa run following command:
brew install exa
Next let’s add alias to our ~/.zshrc file. Let’s open it and add following lines:
vi ~/.zshrc
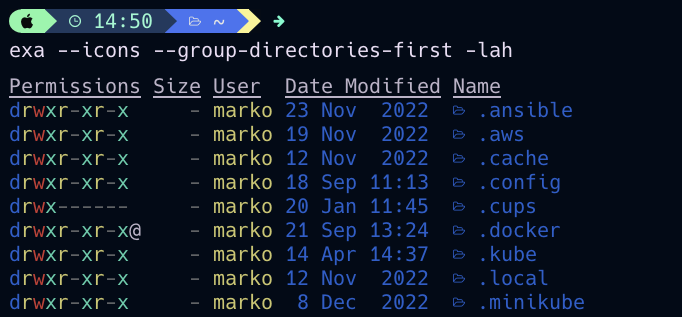
alias ls="exa --icons --group-directories-first"
alias ll="exa --icons --group-directories-first -lah"
This will map exa to our ls and ll commands and we will get more detailed outputs like this one:
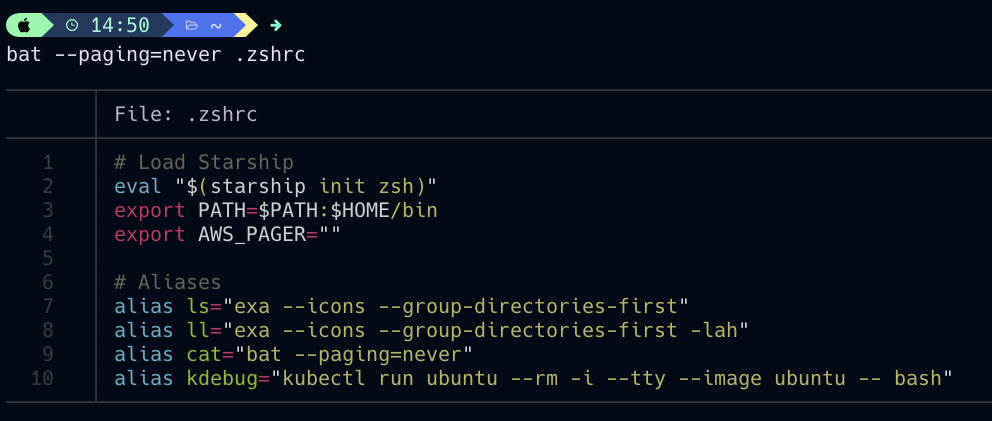
bat #
Bat is a cat clone with syntax highlighting and Git integration. It supports syntax highlighting for a large number of programming and markup languages. Also communicates with git to show modifications with respect to the index. By default, bat pipes its own output to a pager (e.g. less) if the output is too large for one screen. If you would rather bat work like cat all the time (never page output), you can set --paging=never as an option, either on the command line or in your configuration file.
Here is the link to GiHub repository:
A cat(1) clone with wings.
To install bat run following command:
brew install bat
Next let’s add alias to our ~/.zshrc file. Let’s open it and add following lines:
alias cat="bat --paging=never"
This will map bat to our cat command. Now we can enjoy syntax highlighting in files we print out.